Table of Contents
ToggleBuilding or living in a 200 square foot tiny house requires a shift in mindset, it’s not about squeezing life into a smaller footprint, but rethinking how you use every inch. A 200 sq ft tiny house roughly equals a master bedroom and walk-in closet combined, so intentional design becomes non-negotiable. The good news: with smart layouts, functional furniture, and strategic organization, a 200 sq ft space can feel open, livable, and genuinely comfortable. This guide walks through the design principles, DIY strategies, and practical solutions that make tiny living work for homeowners and hobbyists looking to maximize their square footage without sacrificing functionality or style.
Key Takeaways
- A 200 sq ft tiny house requires intentional design and vertical thinking, treating walls as valuable real estate and using every inch functionally rather than just fitting items into a smaller space.
- Multi-functional furniture with hidden storage, loft beds, and built-ins are essential in tiny house layouts since each piece must earn its place and maximize usable floor space.
- Strategic use of light, neutral colors, mirrors, and horizontal lines creates the illusion of more space and prevents a 200 sq ft home from feeling cramped or claustrophobic.
- DIY projects like floating shelves, pegboards, wall desks, and under-bed storage drawers are cost-effective solutions ($30–$3,000+ depending on complexity) that let you customize your tiny house layout without contractor expenses.
- Proper planning—accurate measurements, zoning for sleeping/living/kitchen areas, and checking local building codes for egress windows and ceiling heights—prevents costly mistakes and ensures your tiny house is both legal and livable.
- The true secret to tiny house living is curating what you own and organizing it intentionally, not trying to squeeze more possessions into limited space.
Understanding the 200 Square Foot Layout
A 200 sq ft footprint typically breaks down as a 20′ × 10′ rectangle, though configurations vary. The first step is measuring your space accurately, use a tape measure, not a floor plan guess. Nominal and actual dimensions matter: a standard 8-foot ceiling feels different than a 7-foot 6-inch ceiling, and that half-foot impacts sight lines and perceived openness.
Start by zoning your space functionally. Most 200 sq ft layouts work best with a sleeping area, living area, and kitchenette sharing one open floor plan, or with a bedroom walled off and the rest as combined living and kitchen space. Load-bearing walls are non-negotiable: never remove or cut into them without structural engineer approval and building permits. If renovating or building, check local building codes, most jurisdictions require egress windows in bedrooms and specific ceiling heights for habitable rooms. These aren’t suggestions: they’re legal minimums.
Think vertically from the start. Floor space is precious, so walls become your real estate. Plan wall depth now: will you run shelving, built-ins, or a loft bed platform? Measure ceiling joists and stud spacing (typically 16 inches on center) so you know where fastening and weight distribution actually work. A 200 sq ft space means furniture placement ripples everywhere, so sketch out your intended layout before committing to fixed storage.
Essential Design Strategies for Tiny Living
Multi-Functional Furniture and Built-Ins
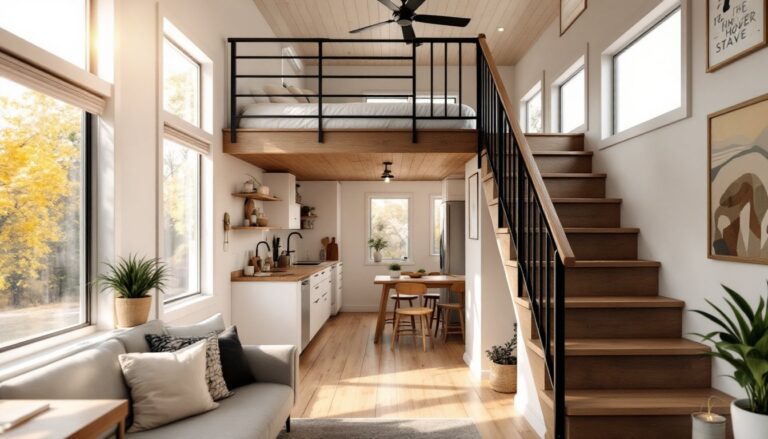
In 200 sq ft, every piece of furniture must earn its space. A sofa that doesn’t recline, sleek, or hide storage is wasted real estate. Look for ottomans with hidden compartments, beds with drawers underneath, and desks that fold or extend. Platforms built as part of the structure, loft beds, sleeping alcoves above a kitchenette, save vastly more space than standalone furniture because they don’t need floor clearance around them.
Built-ins are the tiny house MVP. Installing a simple shelf unit along one wall costs less than a bookcase and gives you permanent, wall-anchored storage that doesn’t shift. A built-in desk tucked into a corner, a murphy bed folded into the wall, or a window seat with storage underneath are structural moves that compress functionality without eating floor space. Measure your wall depth (typically 3.5 inches for standard studs) and plan accordingly, shelving, cabinets, and desks can be custom-fitted or adapted from standard components.
When selecting standalone pieces, choose legs over solid bases: a sofa on thin legs visually “floats,” making the room feel larger than one with a heavy, grounded base. Scale matters too. An overstuffed sectional will dominate 200 sq ft: a compact three-seater or a modular piece you can rearrange works better. Light, natural wood or metal frames feel less heavy than dark, dense furniture.
Vertical Storage and Space Optimization
Your walls go from floor to ceiling, use them. Wall-mounted shelving, pegboards, hooks, and rails store items without consuming floor area. A pegboard above a desk or workbench holds tools, cords, and supplies cleanly. Floating shelves along a living area wall hold books, decor, and personal items while keeping sight lines open.
Loft beds aren’t just bedroom solutions: they’re space multipliers. A loft platform built 5-6 feet high leaves room for a desk, seating, or storage underneath. Use ladder-style stairs instead of bulky staircases, a wooden ladder frame or rope ladder takes minimal space. If building a loft, factor ceiling height: 7 feet 6 inches minimum under the platform, with another 2 feet above for comfortable sleeping.
Corners are sneaky unused real estate. A corner shelf unit, a hanging organizer, or a lazy susan cabinet lets you access and store items without taking up central floor space. Under-bed storage with rolling drawers keeps seasonal items, documents, or linens out of sight. Over-door organizers, magnetic strips on the inside of cabinet doors, and behind-door shelving multiply your storage without adding footprint.
Vertical hanging storage, wall-mounted fabric organizers, pegboards with hooks, hanging file holders, is faster to access than rummaging through cabinets. Label everything clearly so you know where items live. A 200 sq ft space with disorganized storage feels chaotic: the same space organized feels functional and calm.
Creating the Illusion of More Space
Light is your biggest design tool. Natural light makes spaces feel larger, so maximize windows and avoid heavy curtains. Use sheer curtains or blinds you can open fully during the day. If natural light is limited, add recessed lighting and under-cabinet lights in the kitchen area, they create depth and eliminate dark corners that make rooms feel cramped.
Color and finish choices matter more in small spaces. Light, neutral walls (off-white, soft gray, pale beige) reflect light and create visual continuity. A single accent wall in a deeper tone or bold color can work, but don’t overdo it, solid walls of dark color compress the feeling of space. Glossy finishes on cabinetry and trim reflect light: matte finishes absorb it, so consider the trade-off between aesthetics and perceived openness.
Mirrors are a hack worth knowing: a large mirror opposite a window bounces natural light around and creates a visual doubling of the space. Position mirrors thoughtfully, not to reflect clutter, but to multiply light and views. Horizontal lines (stripes, paneling, long shelves) make spaces feel wider: vertical lines make ceilings feel taller. Both can work in 200 sq ft, depending on your proportions.
Minimize visual clutter. Every item on a shelf, every picture on a wall, every object on a counter competes for visual attention. Curate decor intentionally, fewer, higher-quality pieces feel intentional and calm, while crowded shelving feels cramped. Closed storage (cabinets with doors, drawer units) hides clutter better than open shelving, though open shelving with carefully styled items can feel clean if restraint is practiced.
A cohesive design language matters. Mixing too many furniture styles, wood tones, or material finishes makes a space feel chaotic. Stick to two or three dominant materials (light oak + white + concrete, for example) and repeat them throughout. This creates visual calm and makes the space feel more intentionally designed, not makeshift.
Practical DIY Projects for Tiny House Organization
Floating Shelves Installation
Floating shelves are a fast, high-impact project. You’ll need a stud finder, drill, level, and heavy-duty brackets rated for your load. Mark stud locations (typically 16 inches on center), drill pilot holes into the studs, and install brackets at the same height using a level to ensure they’re plumb. Shelves typically sit on brackets with hidden fastening: secure from underneath if possible to keep the face clean. Each stud can support 25-50 pounds depending on the bracket: don’t guess. Use a 3/4-inch thick shelf board (actual dimension, not nominal) for spans under 30 inches to avoid sagging.
Pegboard Workspace
A pegboard transforms wall space into functional storage. Cut plywood or purchase pre-made pegboard, prime and paint it to match your walls, then mount it on cleats 1/4 inch away from the wall (so pegs don’t jam against the wall). Hang hooks, shelves, and clips sized to your items. Pegboards work above desks, in kitchens, for craft supplies, or tools. This project takes an afternoon and costs $30–$50 per 4′ × 8′ sheet, depending on material quality.
Under-Bed Storage Drawers
Building rolling drawers under a bed is straightforward. Use 1/2-inch plywood for sides and bottom, 1×4 lumber for frames, and heavy-duty casters rated for 75+ pounds each. Build a simple box slightly shallower than your bed’s clearance height (typically 8–12 inches), add casters to the bottom, and slide in drawer slides or felt pads so they roll smoothly. Add a simple plywood lid flush with the box top if you want them to look finished. This stores linens, seasonal clothing, or documents out of sight.
Murphy Bed or Wall Bed (Advanced Project)
A Murphy bed that folds up into a wall or cabinet is the ultimate 200 sq ft space multiplier. Pre-made Murphy bed kits ($800–$3,000+) come with springs and hardware: you build a wall frame and attach the kit. This is structural work, it must be anchored into studs and the floor. If building custom, get detailed plans before starting. A basic twin Murphy bed with a fold-down desk or sofa underneath can turn 50 sq ft of bedroom into multi-purpose space. This project requires precision carpentry, decent tools (circular saw, drill, table saw helpful), and ideally a second pair of hands for assembly.
Wall-Mounted Desk
A fold-down or fixed wall desk anchors into studs and saves tremendous floor space. Mount a simple 1×12 board 30 inches high (standard desk height) to brackets secured into studs. Add a chair that tucks under the desk or hangs on the wall when not in use. A 2′ × 1.5′ desk footprint is tight but functional for a laptop or bills. Fold-down models use piano hinges and require more carpentry: fixed desks are simpler if you’re not worried about collapsing it.
Conclusion
A 200 sq ft tiny house works because of intentional design, not luck. Smart zoning, built-in storage, vertical thinking, and psychological tricks like light and color create a space that feels open and functional. DIY projects, floating shelves, pegboards, storage drawers, wall desks, let you customize your layout without paying contractor rates. The real secret isn’t fitting more stuff in: it’s keeping only what truly serves your life and arranging it thoughtfully. Start with accurate measurements, plan before buying, and remember: prep work, not impulse furniture, builds spaces that actually work.