Table of Contents
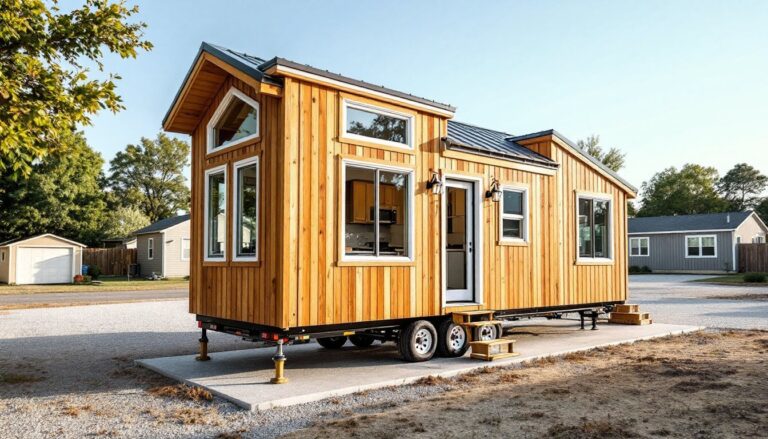
ToggleTiny house living has moved beyond the novelty phase and into the mainstream, with loft-based floor plans emerging as one of the smartest ways to maximize livable space in under 500 square feet. A well-designed loft isn’t just extra sleeping real estate, it’s a game-changer for how you use vertical space and organize your daily living. Whether you’re building from scratch or converting an existing tiny home, understanding the mechanics of loft design helps you avoid costly mistakes and create a layout that actually works for your lifestyle. This guide walks you through why lofts work so effectively in compact homes, shows you real floor plan examples, and covers the practical considerations any DIYer should know before committing to this design choice.
Key Takeaways
- Tiny house floor plans with loft designs maximize vertical space, adding 100–150 square feet of usable area without expanding the home’s footprint or compromising the open-concept feel.
- Loft-based layouts create natural zoning by separating sleeping areas from living spaces at different elevations, making compact homes feel psychologically and physically larger.
- Minimum 6’8″ ceiling clearance is required by building code; verify your home’s actual interior height before planning a loft to ensure safe headroom and code compliance.
- Proper ventilation, guardrail safety (36–42 inches tall with 4-inch balusters), and structural load capacity are non-negotiable design considerations that prevent costly mistakes and liability issues.
- Studio-style lofts work best for one person or couples, while open-concept designs with ground-floor bedrooms suit families and remote workers needing privacy and dedicated office space.
- Always obtain building permits before constructing or retrofitting a loft; unpermitted work creates serious legal and financial complications when selling, regardless of quality.
Why Loft Designs Work So Well in Tiny Houses
The core appeal of a loft in a tiny home is deceptively simple: it lets you use vertical space instead of eating up more horizontal floor area. In a 400-square-foot home, every linear foot matters, and a loft can add 100–150 square feet of usable space without expanding the footprint at all.
Height becomes an asset. Most building codes allow ceiling heights of 9 to 10 feet in the main living area, which leaves room for a mezzanine-style loft above a kitchen, living room, or living/working zone. This approach keeps the ground floor open and airy while tucking a sleeping or storage area overhead.
Loft designs also create natural zoning. Bedtime and daytime activities happen at different elevations, which mentally separates rest from living. In a studio-style open floor plan, that psychological boundary can make a compact space feel bigger. Physically, it does feel bigger because the ground floor isn’t visually cluttered with a bedroom tucked in a corner.
From a construction standpoint, lofts are easier to retrofit than you might think. A lofted bedroom doesn’t require load-bearing walls or major electrical rerouting in many cases, just solid joists, a safe stair or ladder system, and proper guardrails. That’s within reach for homeowners who understand framing basics.
Popular Tiny House Floor Plans With Lofts
Studio-Style Loft Plans
Studio lofts are the minimalist’s choice. The ground floor is one continuous open space, living room, kitchen, and dining area flow together with no walls. A loft bedroom sits above part of the space, accessed by a staircase or ladder on one end. Total square footage typically runs 250–350 square feet on the ground level, with another 100–120 square feet tucked into the loft.
This layout works best for one person or a couple without kids. The open feeling is therapeutic in tight quarters, and cooking smells don’t get trapped behind doors. The tradeoff is zero privacy during the day if your partner is on the couch while you’re trying to work upstairs. Some people solve this with a partial wall or sliding curtain behind the kitchen, but that eats into the openness.
Resources like 10 free floor plans for tiny homes showcase several studio-loft variations that can spark ideas for your own layout. Pay attention to stair placement and headroom height in those plans, they’ll inform your own design decisions.
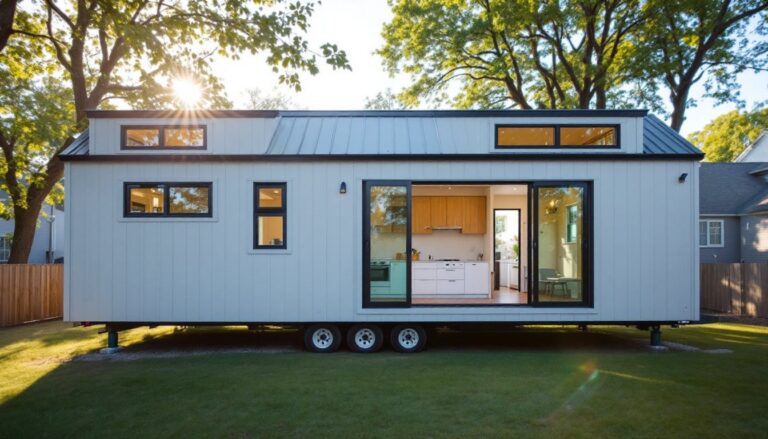
Open-Concept Designs With Bedroom Lofts
Open-concept loft homes are slightly larger, typically 350–500 square feet, and carve out a small downstairs bedroom plus to the lofted sleeping area. The loft becomes a guest room or office, while the main bedroom sits on the ground floor with a real door and window.
This design splits the difference: you get privacy for the main living space without sacrificing the openness of a full studio. It’s ideal for families with one child, or for homeowners who work from home and need a dedicated office loft above the living area. Building code permits are often smoother here because you’re not forcing all sleeping quarters into a mezzanine.
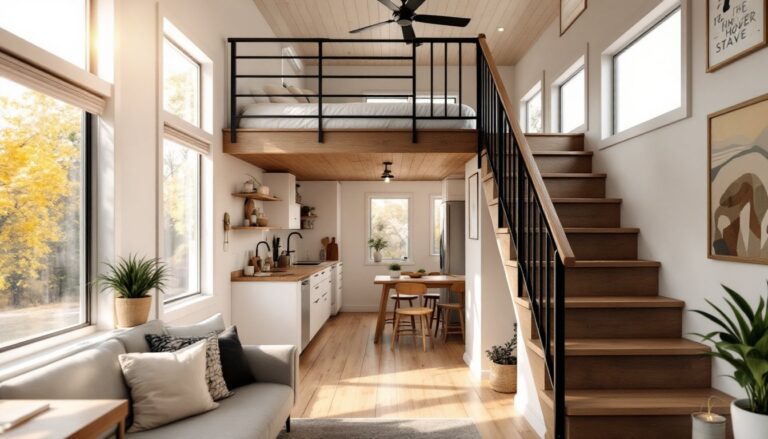
Loft bedroom access in these plans is usually via a staircase with 10–12 steps, angled at around 30–35 degrees. That’s steep compared to a standard interior staircase (which runs 35 degrees), but it conserves floor space while remaining safe and navigable.
Design Considerations for Your Loft Space
Headroom is your first real constraint. Building codes typically require a minimum 6 feet 8 inches of clearance from the finished floor to any ceiling, including under a loft. Measure twice: if your home’s overall interior height is only 9 feet, and you frame a loft with 2×10 joists (9.5 inches nominal), you’re left with roughly 6 feet 10 inches of headroom in the loft, tight, but code-legal. If you use deeper joists like 2x12s, headroom shrinks further. Some tiny homes on trailers have lower overall heights, so verify your actual interior dimensions before designing anything.
Ventilation and airflow matter more in a loft than you’d think. Heat rises, so a lofted bedroom can become an oven in summer if you don’t have an operable window or a ceiling fan circulating air. This is a safety and comfort issue worth planning for upfront, not an afterthought.
Staircase and ladder safety can’t be overlooked. A fixed staircase with proper railings is safer than a ladder, but consumes more floor area (roughly 30–40 square feet, depending on length). A ship’s ladder (steep, narrow staircase) or a library-style rolling ladder saves space but is harder to navigate with groceries or furniture. Some codes require railings on both sides if the staircase is your primary access: confirm this with your local building department before committing to a design.
Weight distribution and structural load are critical if you’re retrofitting a loft into an existing home. Loft joists must span solidly between load-bearing walls or be supported by posts. A full bedroom loft with two people, a bed frame, and storage can easily reach 40–50 pounds per square foot. Verify your existing wall framing can handle this: calling a structural engineer for $300–500 is cheap insurance if you’re unsure. Tiny homes on trailers have even stricter weight limits, check your home’s specifications before loading a loft.
DIY Tips for Building or Modifying Loft Layouts
Before you swing a hammer, confirm whether your project needs a permit. A loft that changes sleeping space or structural integrity almost certainly does. Check with your local building department, some jurisdictions fast-track tiny home modifications, while others require full inspections. It’s frustrating, but selling a home with unpermitted loft work is a legal and financial nightmare.
Material prep is half the battle. If you’re using solid wood framing, acclimate lumber to your home for a few days before cutting and installing. Wood moves as humidity changes, and pre-acclimated material means fewer gaps and squeaks later. Use pressure-treated lumber for any floor joists if there’s any chance of moisture exposure: regular SPF (spruce-pine-fir) will rot.
Railings and guardrails aren’t optional, they’re code. The IRC (International Residential Code) requires guardrails at least 36 inches tall (42 inches recommended for added safety) on any loft or mezzanine. Balusters (vertical spindles) must be spaced so a 4-inch sphere can’t pass through, preventing a child’s head from getting stuck. Build or buy railing systems that meet these specs: it’s not worth the liability or the guilt if someone falls.
When framing, use 3/4-inch plywood for the loft subfloor, laid perpendicular to your joists and fastened with ring-shank nails or 2-inch deck screws. This creates a solid, squeak-resistant platform. Budget an extra $200–400 for quality fasteners and adhesive, they’re the difference between a structure that settles and squeaks for years versus one that stays tight.
For stairs, cut your stringers (the angled support beams) from 2×12 lumber, and verify the rise and run proportions with a framing square before cutting. Small space living ideas often showcase compact staircase solutions and storage tricks that double the functionality of stairs, cubbies under treads, pull-out drawers in risers. These additions don’t compromise safety if done correctly.
Ventilation in the loft requires planning. A ceiling fan with a reversible motor costs $40–80 and pulls hot air down in summer while pushing warm air down from the ceiling in winter. Run electrical rough-in (wiring) for a fixture before closing up the ceiling. If the loft doesn’t have a window, a through-wall duct fan can exhaust moisture outside, protecting your insulation and framing long-term.
Don’t skip insulation details around loft perimeter walls. If your loft is tucked under the roof line or alongside exterior walls, insulate those walls properly to prevent condensation and heat loss. Spray foam or rigid foam board works better than batts in tight confines: batts leave air gaps that compromise performance.
Conclusion
A well-executed loft transforms a tiny home from cramped to clever. The key is respecting the constraints, headroom, load limits, code requirements, and building or modifying with those limits in mind. Start with a detailed floor plan, confirm structural capacity, pull permits, and take your time on railing safety. Once that’s done, you’ve unlocked square footage that no amount of clever furniture can provide. The payoff is a home that feels spacious and functions well, even under 500 square feet.